[DevOps] IOS 빌드 파이프라인 구성
안녕하세요? 정리하는 개발자 워니즈입니다. 필자는 웹서비스 운영에 대해서 경험을 갖고 있습니다. DevOps업무도 여기에 국한되어 있는데요. 최근에 프로젝트에서 App Build 파이프라인이 필요하였습니다. 영역을 확장하는 것도 있고 AOS/IOS 빌드 파이프라인에 대해서도 궁금했었습니다. 오늘의 포스팅은 IOS에 대한 빌드 구성을 진행하면서 학습했던 내용들에 대해서 정리를 해보려고합니다.
1. Appstore에 초대
처음 IOS 개발을 진행하면 배포에 대해서 궁금해질텐데요. AOS/IOS는 각자 맞는 플랫폼에 배포를 진행해야 합니다. IOS는 Appstore에 배포를 하게 되는데요. 사내에 Apple Developer 회사 계정이 있어서 Team내에 초대가 되었고 이를 통해서 필요한 개념들을 확인할 수 있었습니다.
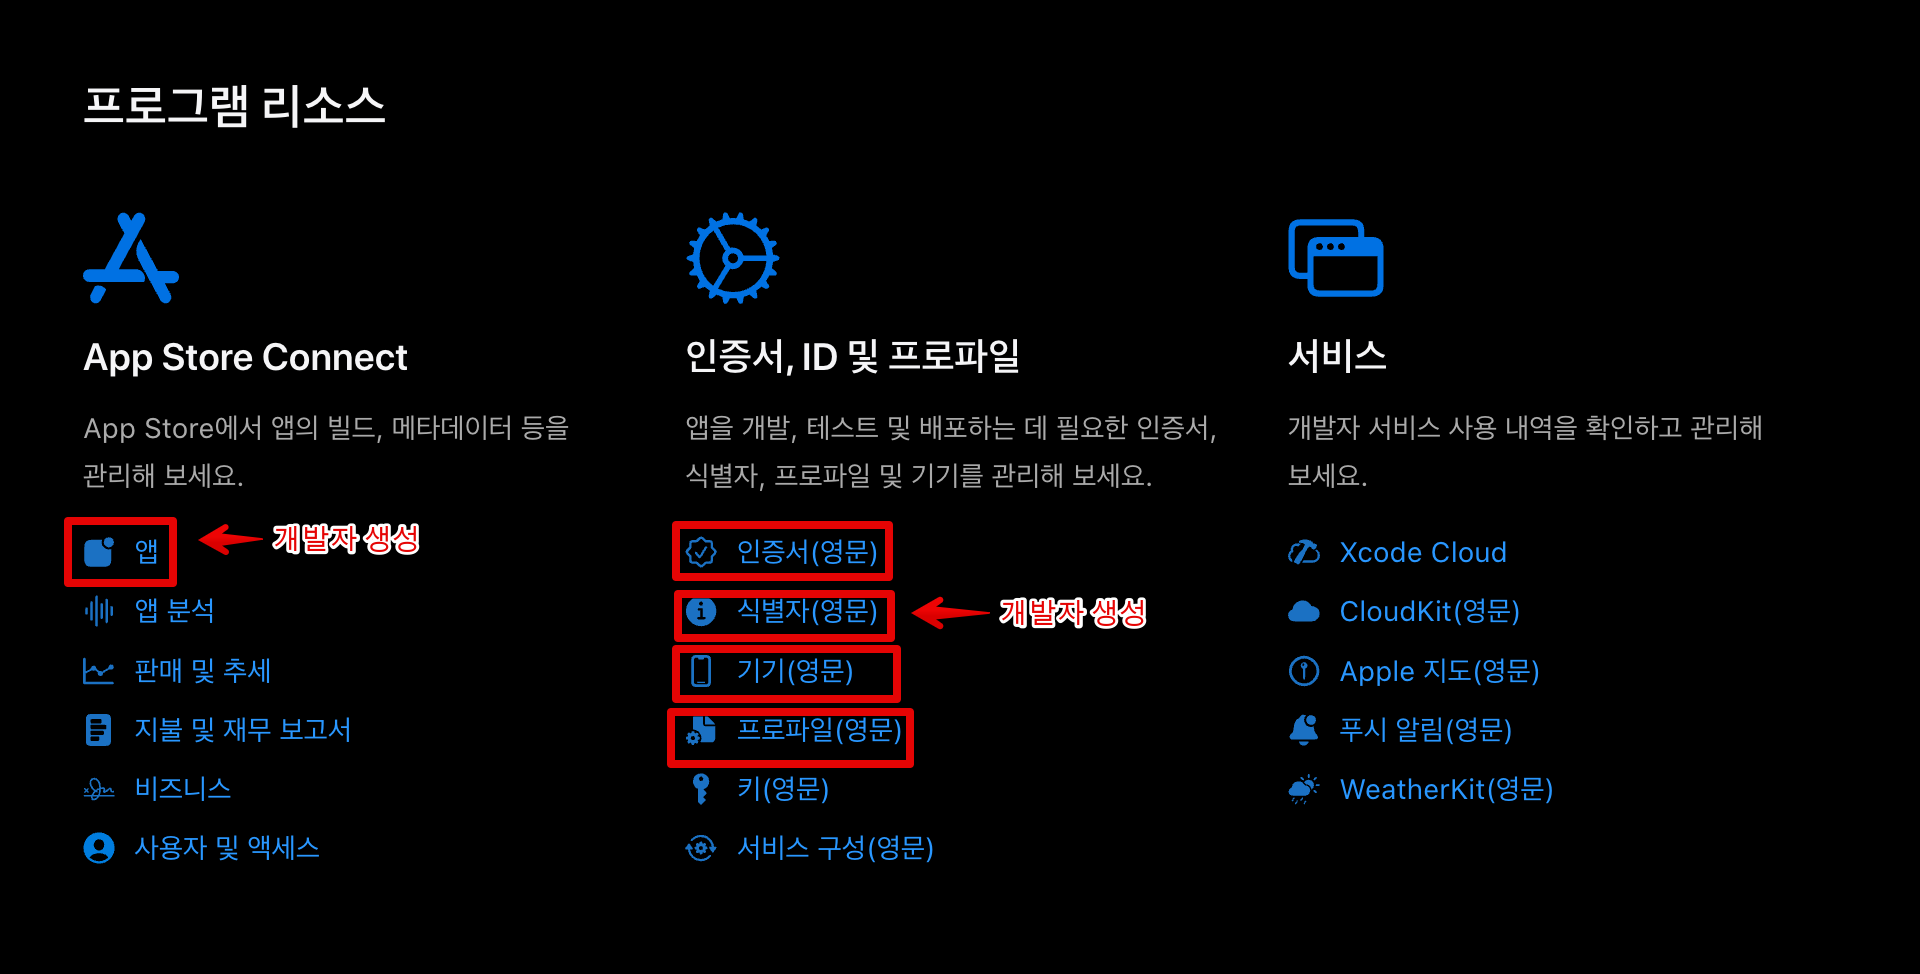
필자는 위의 캡쳐처럼 기준을 세웠습니다.
- Appstore Connect의
앱영역은 개발자가 직접 생성한다. - 인증서, ID 및 프로파일의
식별자(영문)은 개발자가 직접 생성한다.
이외에 빌드와 관련한 정보는 DevOps에서 생성 관리하기로 했습니다.
인증서(영문)기기(영문)프로파일(영문)
그러면 이러한 개념들에 대해서 간단히 정리를 해보도록 하겠습니다.
2. 인증서, 프로파일이란?
인증서? 기존에 웹서비스 운영을 하다보면 https 프로토콜을 지원하기 위한 사이트 인증의 개념으로만 생각했었습니다. 대체 IOS앱 빌드를 할 때 어떠한 부분에서 인증서가 필요한지 궁금해졌습니다.
1) 애플에서의 인증서 개념
인증서는 애플이 개발자를 신뢰할 수 있는 보증서입니다. 여기서 코드 서명이라는 개념과 연결이 되는데요. 애플에서 발행한 인증서를 통해서 코드를 디지털 서명하는 과정을 거치게 됩니다.
인증서를 생성해보겠습니다.
인증서 생성 과정
- Certificate Signing Request (CSR) 생성:

- MAC의 keychain 앱 실행 → 키체인 접근 → 인증서 지원 → 인증 기관에서 인증서 요청
- 로컬 시스템에서 개인 키와 CSR 파일을 생성합니다.
- CSR 파일은 공개 키와 요청자의 정보를 포함하며, Apple Developer Portal에서 인증서를 생성하는 데 사용됩니다.
- CSR 파일 제출:
- Apple Developer Portal에 CSR 파일을 제출하여 인증서를 생성합니다.
- 인증서 다운로드:
- Apple Developer Portal에서 생성된 인증서 (
.cer파일)를 다운로드합니다.
- 인증서 설치:
- 다운로드한
.cer파일을 로컬 시스템에 설치합니다. - 이 과정에서 공개 키와 개인 키가 로컬 키체인에 연결됩니다.
P12로 인증서 내보내기
- 인증서를 다운로드하면 .cer 파일이 다운로드 됩니다. 이것만으로는 인증서로부터 인증을 할 수 없습니다. 더블클릭합니다.
- 키체인에 접속을 합니다. 로그인 > 내 인증서 > 생성한 인증서 우클릭 내보내기 클릭
- 개인 정보 교확(p.12)를 선택하고 저장하면 내보내기가 수행됩니다.
개발자간에 인증서, 프로파일을 공유하기 위해서는 .cer파일과 .p12파일을 전달 해야 합니다.
2) 애플에서의 프로파일 개념
위의 과정을 통해서 앱 인증을 했다고 모든 Device에서 설치가 가능할까요? 아닙니다. 여기서 Profile에 대한 개념을 알아야 합니다.
프로비저닝 프로파일 안에 앱 실행에 필요한 App ID 라든지, Entitlement, Certificate, Device ID 정보들을 담아두고, 실제로 구동되는 디바이스 환경이 이 조건에 부합하면 그제서야 앱 실행을 허용합니다. 이런 온갖 제약 조건, 즉 디바이스 내에서 앱을 실행하기 위한 규칙을 모아놓은 것이 바로 “프로비저닝 프로파일” 입니다.
프로비저닝 프로파일은 app id, certificate, device정보를 가지고 있어, iOS기기 애플 인증서를 연결 해주는 역할
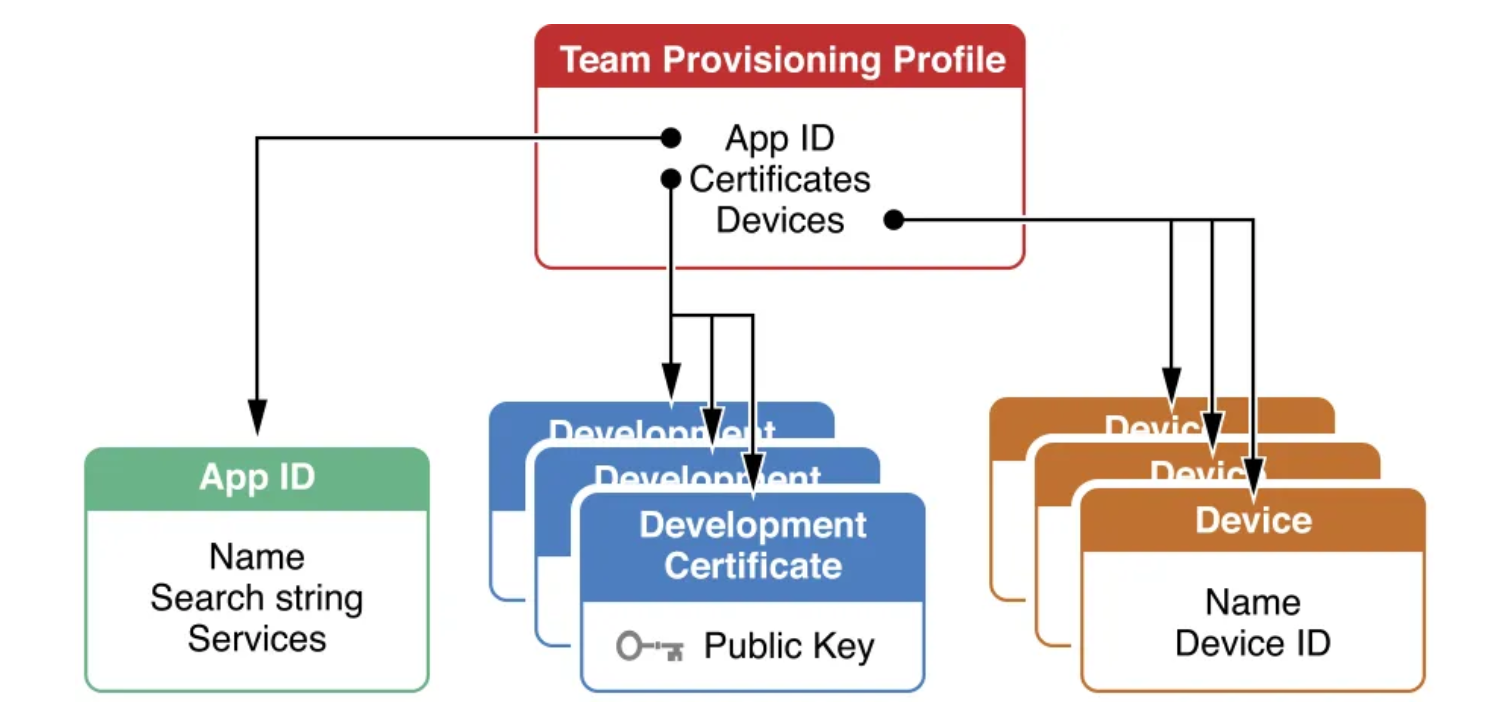
Provisioning Profile에는 위의 그림처럼 3가지가 들어가게됩니다.
- App ID : 앱 스토어에 등록될 Bundle ID가 등록.
- Certificate : 위에서 만들었던 인증서.
- Device : 디바이스의 UDID
초기 App을 생성하기 위해서는 App ID를 신규로 생성해야 합니다. 허용가능한 Device 목록을 정의하기 위해서는 UDID를 통해서 Device 등록이 필요합니다.
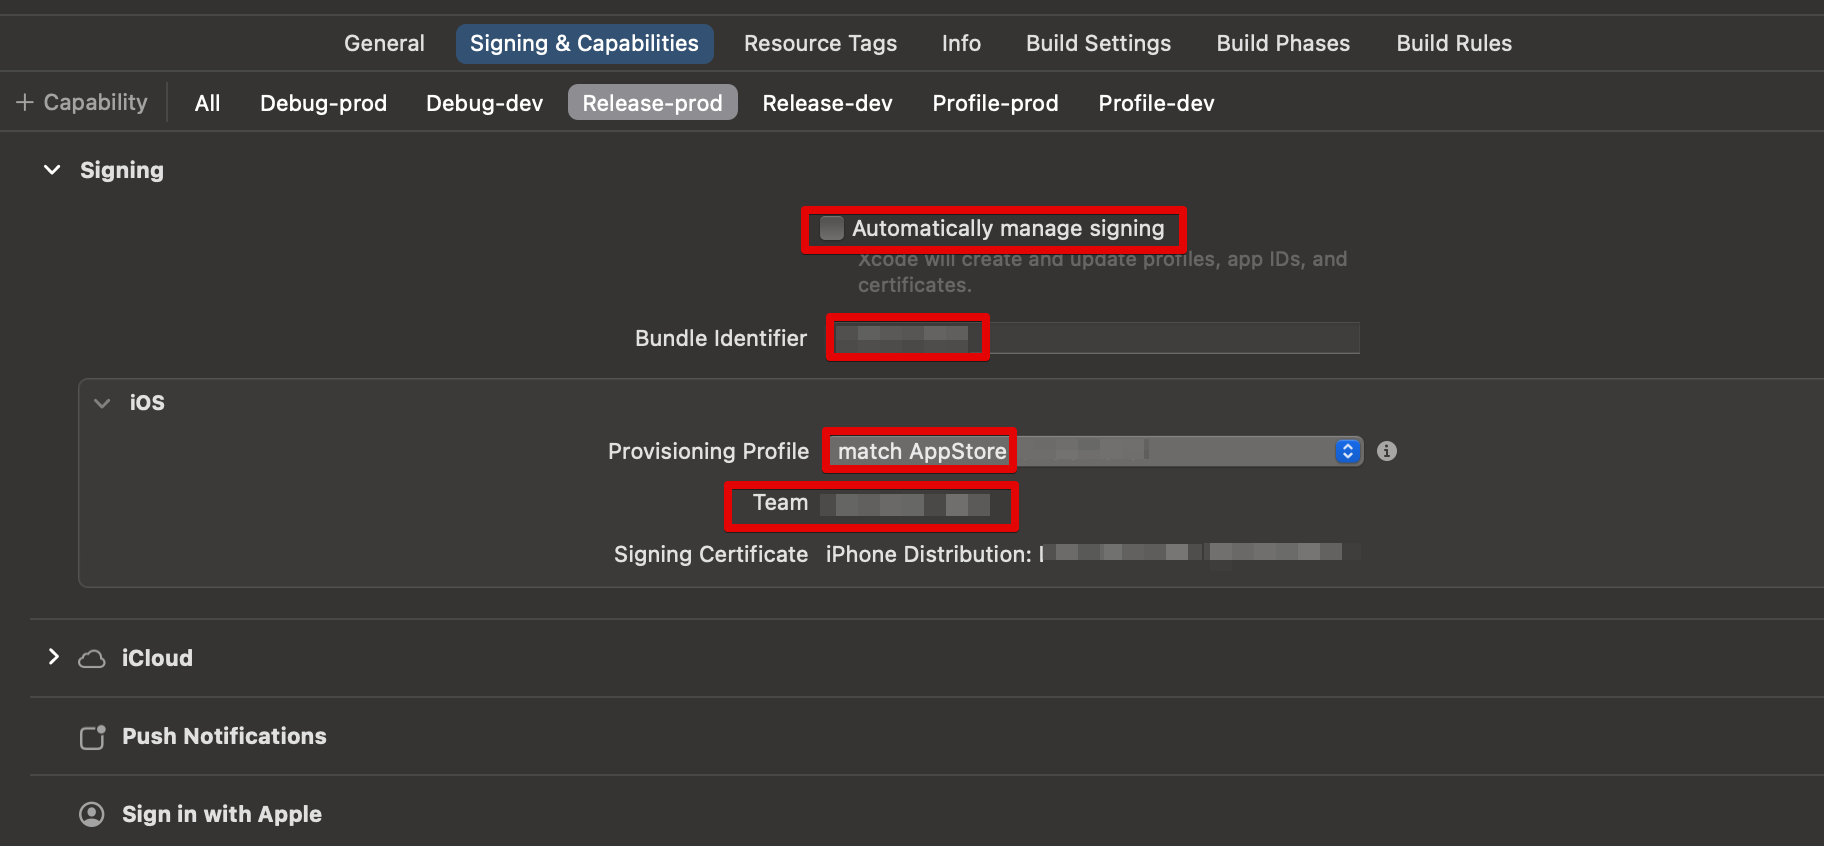
xcode에서도 확인을 하면 아래와 같이 Provisioning Profile을 수동 지정할 수 있는것을 확인하게 됩니다.
만약, Device의 추가나 삭제 혹은 변경이 있어서 Profile을 업데이트해줘야 할때는 어떻게 해야할까요? 기존의 내용을 삭제 하고 신규로 생성을 해주면 됩니다. 다음의 블로그에 정리가 잘 되어있어서 참고하겠습니다.
3. Fastlane을 통한 자동화
그럼 이제 빌드를 하기 위해서 인증서, 프로파일이 모두 준비 되었습니다. 이상태에서는 로컬에서 충분히 빌드가 가능할 것입니다. 하지만 DevOps에서는 자동화 파이프라인을 제공해주기 위해 Fastlane을 도입하기로 했습니다.
Fastlane은 iOS 및 Android 앱 배포와 관련된 반복 작업을 자동화하는 도구입니다. Fastlane을 사용하면 코드 서명, 빌드, 테스트, 배포 등의 작업을 쉽게 자동화할 수 있습니다. Fastlane 설정 파일에는 Appfile, Fastfile, Matchfile 등이 포함되며, 각각의 역할은 다음과 같습니다
- Appfile: 앱의 기본 설정을 정의합니다. (앱 식별자, Apple ID, 팀 ID 등)
- Fastfile: 다양한 작업(workflow)을 정의합니다. (빌드, 테스트, 배포 등)
- Matchfile:
match기능과 관련된 설정을 정의합니다. (코드 서명 인증서 및 프로비저닝 프로파일 관리)
Fastlane 설치 및 사용법
설치
# brew 이용하여 설치
brew install fastlane

# version 확인
fastlane --version

2024/5/28 iMac(AD01965998) 설치 버전 : 2.220.0
(path: /usr/local/Cellar/fastlane/2.220.0/libexec/gems/fastlane-2.220.0/bin/fastlane)
Appfile
Appfile은 Fastlane 프로젝트의 기본 설정을 정의하는 파일입니다. 주로 앱의 식별자와 관련된 정보를 포함합니다.
예시: Appfile
app_identifier("com.example.myapp")# 앱의 번들 식별자
apple_id("your_email@example.com")# Apple Developer 계정 이메일

team_id("YOUR_TEAM_ID")# Apple Developer 팀 ID
app_identifier: 앱의 번들 식별자입니다. Xcode 프로젝트의General탭에서 찾을 수 있습니다.apple_id: Apple Developer 계정 이메일입니다.team_id: Apple Developer 팀 ID입니다. Apple Developer 계정에서 확인할 수 있습니다.
Fastfile
Fastfile은 Fastlane의 핵심 파일로, 다양한 작업(workflow)을 정의합니다. Fastlane 명령어를 사용하여 빌드, 테스트, 배포 등의 작업을 자동화할 수 있습니다.
예시: Fastfile
ruby코드 복사
default_platform(:ios)

platform :ios do
  desc "Build and release a new version to the App Store"
  lane :release do
    match(type: "appstore")# 코드 서명 인증서 및 프로비저닝 프로파일 관리
    build_app(scheme: "MyApp")# 앱 빌드
    upload_to_app_store# App Store Connect에 업로드
  end

  desc "Run unit tests"
  lane :test do
    scan(scheme: "MyApp")# 유닛 테스트 실행
  end
end
default_platform: 기본 플랫폼을 설정합니다. 여기서는:ios를 사용합니다.platform: 특정 플랫폼에 대한 작업을 정의합니다.:ios또는:android를 사용할 수 있습니다.lane: 작업(workflow)을 정의합니다. 예를 들어,release레인은 앱을 빌드하고 App Store에 업로드하는 작업을 포함합니다.
Matchfile
Matchfile은 Fastlane의 match 기능과 관련된 설정을 정의합니다. match는 코드 서명 인증서와 프로비저닝 프로파일을 관리하고 공유하는 데 사용됩니다.
예시: Matchfile
git_url("<https://github.com/your_username/certificates_repo.git>")# 인증서를 저장할 Git 리포지토리

storage_mode("git")# 인증서 저장 방식 (기본값은 "git")
type("appstore")# 인증서 유형 ("development", "appstore", "adhoc", "enterprise")

app_identifier(["com.example.myapp"])# 앱의 번들 식별자
username("your_email@example.com")# Apple Developer 계정 이메일
team_id("YOUR_TEAM_ID")# Apple Developer 팀 ID
git_url: 인증서와 프로비저닝 프로파일을 저장할 Git 리포지토리 URL입니다.storage_mode: 인증서 저장 방식을 설정합니다. 기본값은 “git”입니다.type: 인증서 유형을 설정합니다. 예를 들어, “development”, “appstore”, “adhoc”, “enterprise” 등이 있습니다.app_identifier: 앱의 번들 식별자입니다.username: Apple Developer 계정 이메일입니다.team_id: Apple Developer 팀 ID입니다.
이러한 파일들을 사용하여 Fastlane을 설정하면, iOS 앱의 빌드 및 배포 과정을 자동화하고 효율적으로 관리할 수 있습니다.
인증서 생성
fastlane match nuke development
fastlane match nuke distribution
- match로 인증서를 생성하기 전에,
fastlane match nuke명령어로 기존 인증서들을 지울 수 있다. 필수사항은 아니지만 권장사항이다. 기존의 인증서들과 함께 새로운 인증서가 계속 쌓이게 되면 관리가 어렵기 때문이다. - *기존의 모든 인증서가 날라가기 때문에 충분히 의사소통 후 명령어를 사용해야 한다.
fastlane match appstore
fastlane match development
- 이후 인증서를 새로 만든다.
[17:38:29]: Make sure to remember the password, as you'll need it when you run match on a different machine
[17:38:29]: Passphrase for Match storage: ********
[17:40:40]: Type passphrase again: ********
- 진행하다보면
passphrase생성을 요구하는데, 다른 컴퓨터에서 match 를 실행할 때 필요하므로 잘 저장해둬야 한다. (Passphrase for Match storage -> match 비밀번호 설정) 위에서 설정한 .env 파일에 넣어두는 것도 방법이다. - 인증서 생성이 완료되었다면, repository에 인증 파일이 생성되어 있는 걸 확인 할 수 있다.
- 다른 팀원들의 인증서와 프로비저닝 프로파일을 설정하기 위해서는 위의 private repository를 초대하고
fastlane match development --readonly명령어를 통해 match 설정만 하면 된다.
4. 빌드를 해보자! ( Feat. Fastlane )
이제 모든 준비는 끝났습니다. 인증서를 통해서 앱 인증을 하고, 프로파일을 통해서 기기에서 실행이 가능한지를 확인할 수 있었습니다. 그리고 Fastlane을 통해서 IOS 앱 빌드를 수행하고, Appstore에 testflight로 업로드를 할 수 있도록 자동화를 하려고합니다.
빌드 파이프라인 구성도
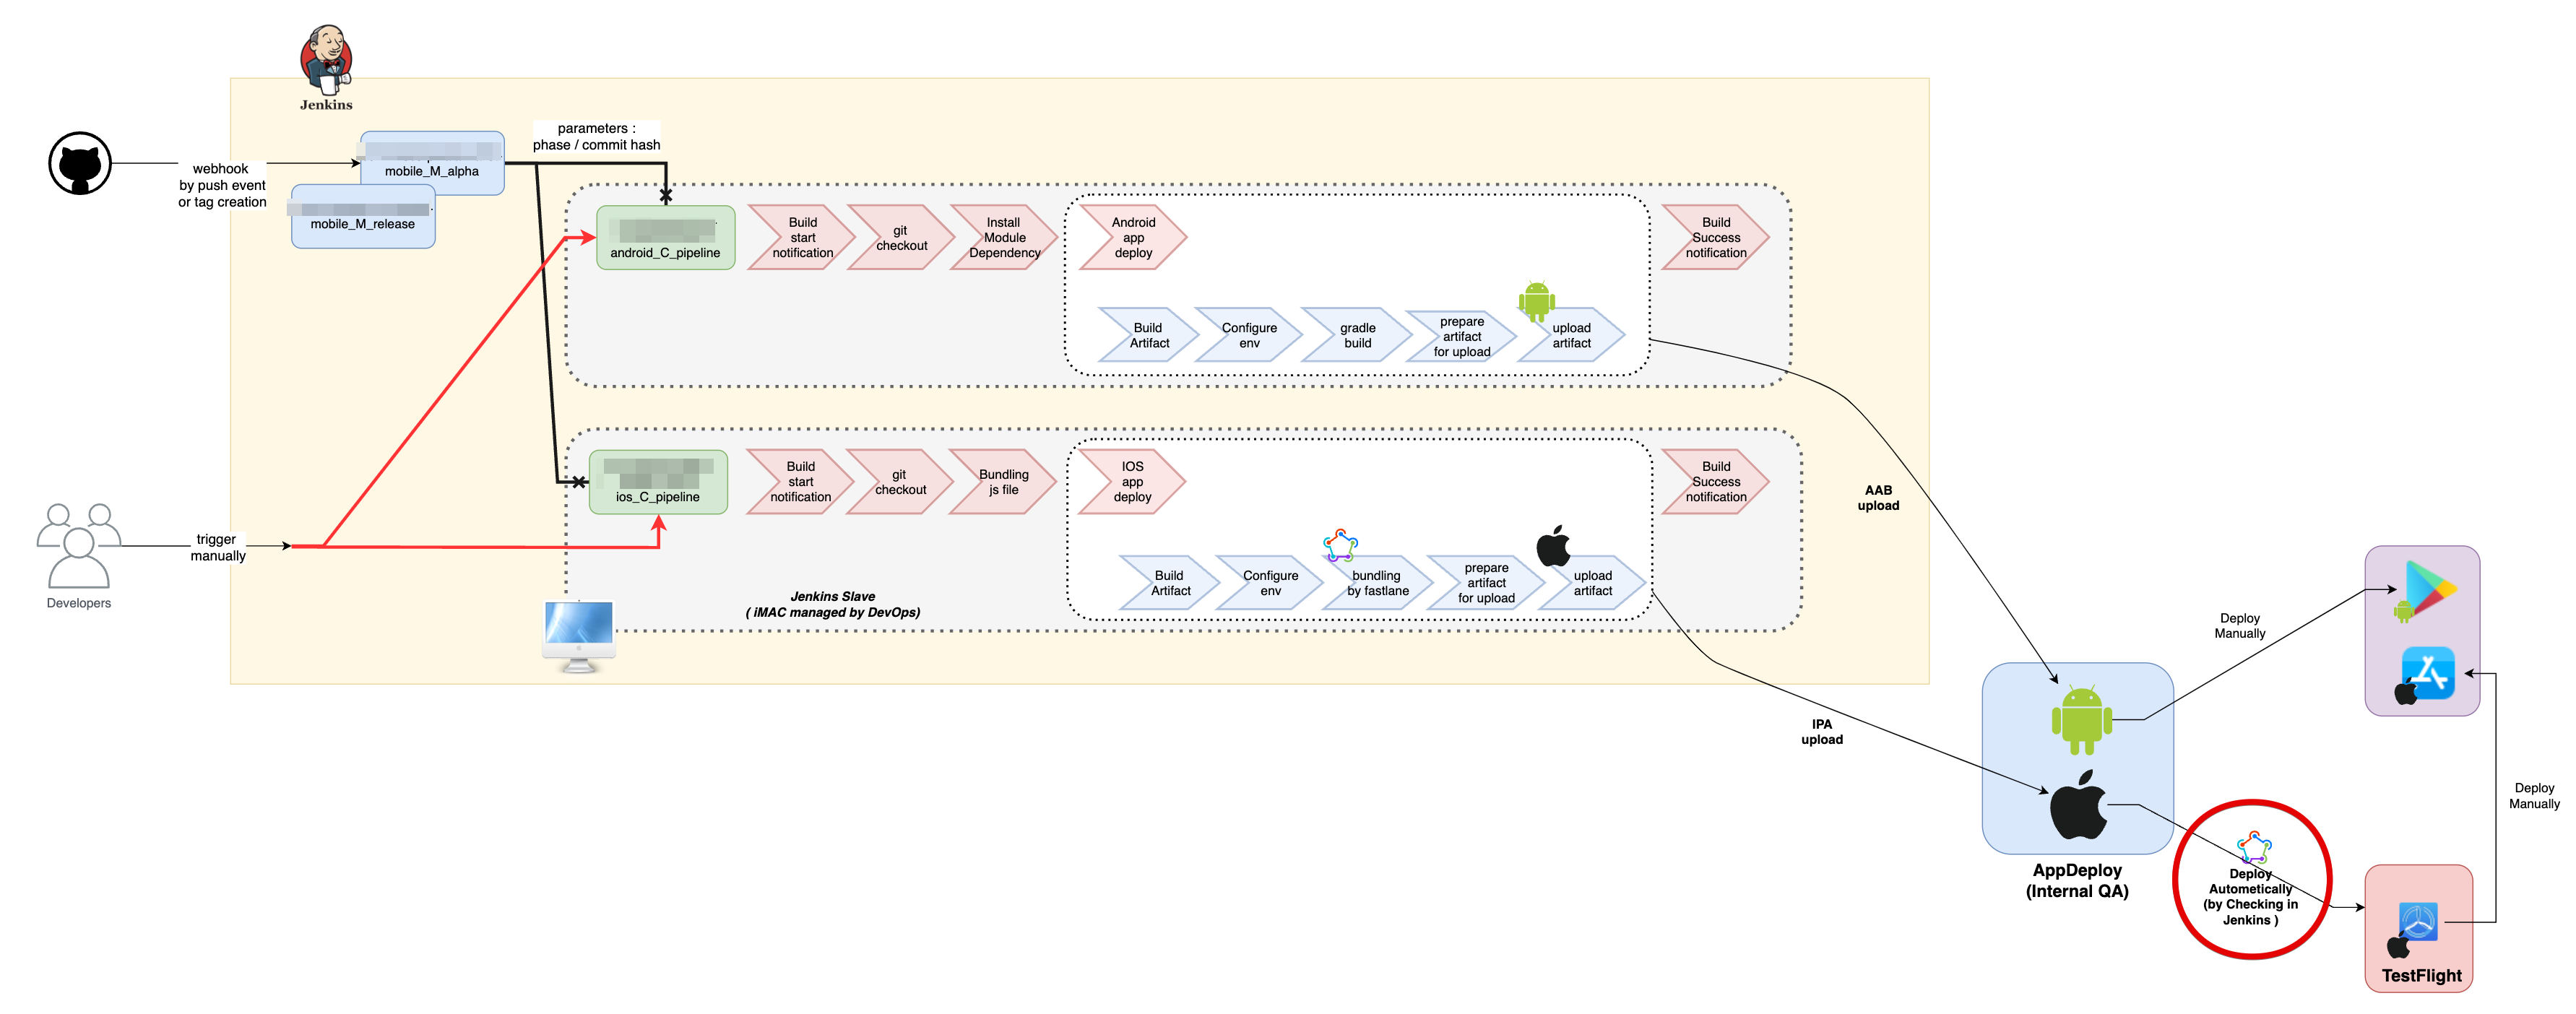
파이프라인을 통해서 AOS/IOS를 빌드를 수행합니다. 이후에 사내에 존재하는 Internal System을 통해서 apk혹은 IPA파일을 업로드 합니다.
fastlane은 IOS에 대해서 사용자 선택에 따라서 testflight까지 자동 업로드 해줄 수 있도록 설정했습니다.이후에 Store에 출시하는것은 수동으로 수행하도록 기준을 정의했습니다.
Fastlane Fastfile 샘플
default_platform(:ios)

# 공통 변수 설정
 api_key = app_store_connect_api_key(
   key_id: ENV['ASCAPI_KEY_ID'],
   issuer_id: ENV['ASCAPI_ISSUER_ID'],
   key_content: ENV['ASCAPI_KEY_CONTENT']
 )

archiveDir = '../build/ios/archive/Runner.xcarchive'
output_directory_beta = "../build/ios/output/beta"
output_directory_release = "../build/ios/output/release"
app_identifier_dev = "io.test.wallet.dev"
app_identifier_prod = "io.test.wallet"

platform :ios do
  desc "get latest testflight build number"
  lane :get_build_number do |options|
    app_identifier = options[:app_identifier]

    jenkins_build_number = ENV['JENKINS_BUILD_NUMBER'] || '0'
    main_version_number = ENV['MAIN_VERSION_NUMBER'] || '1.0.0'
    new_build_number = "#{jenkins_build_number}"
  end

  desc "create plist file for in-house deploy"
  lane :create_plist do |options|
    require 'plist'

    # 파라미터로부터 변수 값 설정
    plist_path = options[:plist_path]
    url = options[:url]
    bundle_identifier = options[:bundle_identifier]
    bundle_version = options[:bundle_version]
    app_title = options[:app_title]

    plist_content = {
      'items' => [
        {
          'assets' => [
            {
              'kind' => 'software-package',
              'url' => url
            }
          ],
          'metadata' => {
            'bundle-identifier' => bundle_identifier,
            'bundle-version' => bundle_version,
            'kind' => 'software',
            'title' => app_title
          }
        }
      ]
    }

    File.open(plist_path, 'w') do |file|
      file.write(plist_content.to_plist)
    end
  end

  desc "Upload to Testflight"
  lane :upload_into_testflight do |options|
    directory_path = options[:directory_path]
    app_identifier = options[:app_identifier]

    if ENV['UPLOAD_TO_TESTFLIGHT'] == 'true'
      pilot(
        skip_submission: true,
        ipa: "#{directory_path}/Runner.ipa",
        app_identifier: app_identifier,
        api_key: api_key
      )
    else
      puts "Skipping pilot step as UPLOAD_TO_TESTFLIGHT is not set to true."
    end
  end

  desc "Build BETA"
  lane :beta do
  get_build_number(app_identifier: app_identifier_dev)
  # 환경 변수에 따라 분기 처리
  if ENV['UPLOAD_TO_TESTFLIGHT'] == 'true'
      match(platform: "ios", type: "appstore", app_identifier: app_identifier_dev, readonly: true)
      clear_derived_data
      build_app(workspace: "Runner.xcworkspace", scheme: "dev", configuration: "Release-dev", archive_path: archiveDir, output_directory: output_directory_beta, export_method: 'app-store', export_options: {provisioningProfiles: {app_identifier_dev => "match AppStore #{app_identifier_dev}"}})
  else
      match(platform: "ios", type: "adhoc", app_identifier: app_identifier_dev, readonly: true)
      clear_derived_data
      build_app(workspace: "Runner.xcworkspace", scheme: "dev", configuration: "Release-dev", archive_path: archiveDir, output_directory: output_directory_beta, export_method: 'ad-hoc', export_options: {provisioningProfiles: {app_identifier_dev => "match AdHoc #{app_identifier_dev}"}})
  end
    create_plist(plist_path: "../" + output_directory_beta + "/Runner.plist", url: 'Change URL', bundle_identifier: app_identifier_dev, bundle_version: ENV['MAIN_VERSION_NUMBER'], app_title: 'Kaia Wallet')
    upload_into_testflight(directory_path: output_directory_beta, app_identifier: app_identifier_dev)
end

  desc "Build RELEASE"
  lane :release do
  get_build_number(app_identifier: app_identifier_prod)
  if ENV['UPLOAD_TO_TESTFLIGHT'] == 'true'
      match(platform: "ios", type: "appstore", app_identifier: app_identifier_prod, readonly: true)
      clear_derived_data
      build_app(workspace: "Runner.xcworkspace", scheme: "prod", configuration: "Release-prod", archive_path: archiveDir, output_directory: output_directory_release, export_method: 'app-store', export_options: {provisioningProfiles: {app_identifier_prod => "match AppStore #{app_identifier_prod}"}})
  else
      match(platform: "ios", type: "adhoc", app_identifier: app_identifier_prod, readonly: true)
      clear_derived_data
      build_app(workspace: "Runner.xcworkspace", scheme: "prod", configuration: "Release-prod", archive_path: archiveDir, output_directory: output_directory_release, export_method: 'ad-hoc', export_options: {provisioningProfiles: {app_identifier_prod => "match AdHoc #{app_identifier_prod}"}})
  end
    create_plist(plist_path: "../" + output_directory_release + "/Runner.plist", url: 'Change URL', bundle_identifier: app_identifier_prod, bundle_version: ENV['MAIN_VERSION_NUMBER'], app_title: 'Kaia Wallet')
    upload_into_testflight(directory_path: output_directory_release, app_identifier: app_identifier_prod)
  end
end
빌드에 대한 순서는 다음과 같습니다.
- get_build_number : mainversion + jenkins buildnumber ex) 2.3.0.93
- match : 인증서, 프로파일 확인 및 동기화
- clear_derived_data : 빌드시 생성한 임시 파일들 삭제
- build_app : 아카이빙(빌드) 수행
- create_plist : in-house 배포를 위한 plist 파일 생성
- upload_into_testflight : 사용자 선택에 따라 testflight 업로드 수행
5. 마치며…
이번시간에는 IOS의 빌드 파이프라인을 구성하면서 알게 된 개념들에 대해서 정리를 해보았습니다. 처음에는 인증서, 프로파일 개념을 이해하는데 너무 힘들었습니다. 그리고 본격적으로 파이프라인 구성할떄에는 Fastlane개념도 이해하는데 힘들었습니다. 하지만 모든 과정들을 학습하고 적용하면서 IOS 빌드 과정을 이해할 수 있는 작업이였던 것 같습니다. 다음에는 간단하게 빌드 파이프라인을 구성하면서 맞이했던 이슈들에 대해서 처리하는 과정들에 대해서 정리를 해보도록 하겠습니다. 감사합니다.
6. 참조
- Certificate & Profile
- Fastlane